Friday, March 30, 2012

Easy Black Bean Soup & A Petition to Keep BPA Out of Our Food

I don't eat a lot of boxed and canned food. But a lot of people do. And some things are cheaper and more convenient that way. One of the things I do buy cans of: black beans. They're just so much easier than dried. And there's no angst because you forgot to soak the beans. Or at the other end of the spectrum forgot they were soaking and let them go moldy. I'm guilty of both charges.

But I get a little nervous every time I reach for this convenience because the cans are often lined with BPA. Bisphenol A is a chemical often found in plastics. It's a hormone disruptor that can be especially toxic to kids and pregnant women. It can be found all over the place, including in shower curtains, baby bottles, register receipts, and lining all kinds of food packaging including some baby formulas and lots of canned goods. It's even in the lids of my beloved Ball jars. While some companies have already responded to public outcry and removed BPA from their products, it's still everywhere, including leaching into canned goods like black beans.

In a few days the Food and Drug Administration is supposed to respond to a lawsuit concerning the use of BPA in packaged foods. Tons of organizations have been petitioning to ban BPA in food packaging. It's a no brainer. That's why I'm asking you to take a moment and sign the petition to the FDA. Do it now. Tell the FDA you don't want food with a side order of BPA and then come back and I'll tell you about this soup. For those of you who want to know more about BPA, here's a short article about how widespread BPA contamination is and the Huffington Post has another article about all the organizations, celebs, and petitions that support the ban of BPA.
And now for the recipe! I love this black bean soup because it comes together in a half hour or less, but tastes restaurant caliber, especially the next day. It also requires like -10 cooking skill. Seriously, if you can push stuff around in a pan and own a blender or immersion blender, you're golden. You only need a few ingredients and it's really forgiving in terms of measurements. This would be a great first recipe to get into making soups.

First up, you chop and saute a half pound of chorizo.
Then you take the chorizo out and saute a couple of bell peppers and some onion.
Then you add a can of black beans, some wine, broth, and a few seasonings. And puree.
The you add the chorizo back in and another can of beans.
Simmer a few minutes just to heat through and serve with dollops of sour cream and cilantro.

Easy Black Bean Soup
Adapted from Eating Cuban
Serves 6
Cooking Time: Approx. 30 min.

Ingredients

1/2 pound chorizo (If you can't find chorizo, you could sub Italian sausage.)
2 bell peppers, chopped (I like red or yellow, but green work too.)
1 medium onion (about 1 1/2 cups), chopped
1 tablespoon garlic, minced
1 1/2 teaspoons dried oregano
2 teaspoons cumin
2 15 ounce cans black beans, with liquid (Try to look for beans with little or no added salt.)
1/4 cup red cooking wine (or just sub dry red wine)
1 tablespoon brown sugar
1 cup chicken broth
salt, to taste
olive oil, for sauteeing
cilantro & sour cream, for garnish

Directions

1. Squeeze the chorizo out of its casing and roughly chop. Saute over medium heat for a few minutes until cooked through and beginning to brown on the outside. Remove from pan and set aside.

2. Add some olive oil to the same pan and add the onion and bell pepper. Saute until the onions and peppers begin to soften, about 5 minutes.

3. Add the garlic, cumin, and oregano and saute until garlic is fragrant, about 1 minute.

4. Add 1 can of beans with the liquid from the can, the wine, sugar, and broth.

5. Puree with an immersion blender.

6. Return the chorizo to the pan and add the other can of beans with its liquid. Stir and add salt if needed. Once, heated through the soup is ready to go, but you can simmer a few more minutes to meld the flavors a little more. This soup is even better day 2 and 3.

Friday, March 23, 2012

Speculaas Cookies (Biscoff Copycat)

A while back I posted about chocolate chip cookies and proclaimed my unwavering devotion to chewy (rather than cakey or crispy cookies). However, there is a loophole in my rule. I'm going to call it the dunkable cookie rule. A cookie is allowed to be crispy if it is dunkable. Oreos and biscotti would be prime examples. One of my favorite dunkable cookies is the Biscoff cookie. If you're not familiar with this cookie or the equally awesome spread, you are missing out. Biscoffs are soooo good with coffee or tea.
This copycat comes darn close to the real deal, especially if you age the dough overnight. They're a bit too orangey and don't brown evenly if you bake them immediately. Unlike most cookies, these aren't laden with cups and cups of butter. So you can have 3 or 4 for dessert without wreaking havoc on your calories for the week. This recipe make a lot of cookies, but they freeze really nicely. I double wrapped stacks of a dozen and put them in freezer bags. Just let them come to room temp and they taste like you baked them that day. I could also see using any extra cookies for other uses--mashed into ice cream, alongside a pudding dessert, crushed to make a crust for a tart, dipped in dark chocolate and given as a gift. The mild spicing makes this cookie ideal for a lot of uses.

The dough is pretty straight forward.
Rolled nice and thin before baking:
Leave a little more space between cookies than I did though. Some of mine came out connected. Keep an eye on these in the oven too because they're rolled so thin. My baking time was a scant 7 minutes. You can roll them thicker, but I really like this wafer consistency. Rolled out thicker I felt they were too crunchy.

Cooling:
Speculaas Cookies (Biscoff Copycat)
Adapted from Baked Explorations: Classic American Desserts Reinvented
Yield: 60-75 cookies (I got 73 cookies, 2 1/4" round.)
Cooking Time: 12 hours (20 min. to mix dough, overnight refrigeration, 1 hour rolling out/ baking cookies)

Ingredients

1 3/4 cups flour
1 cup packed dark brown sugar
1/2 teaspoon baking soda
1 1/2 Tablespoons cinnamon
1/2 teaspoon nutmeg
1/2 teaspoon cloves
1/2 teaspoon ginger
1/2 teaspoon salt
1 teaspoon grated orange zest

10 Tablespoons butter (cut into small cubes)
1 egg, beaten

Directions

1. Combine all the dry ingredients, spices, and orange zest.

2. Cut in the butter using a pastry blender. Then cut in the egg.

3. Knead the dough until it forms a ball and then refrigerate overnight. (If you want to continue sooner, refrigerate at least one hour.)

4. Preheat your oven to 350 degrees and line two baking sheets with parchment paper or baking mats.

5. Flour your work surface and roll out fist-sized chunks of dough until very thin, 1/8 of an inch. Leave the rest of the dough in the fridge until you're ready to use it. Cut your cookies and form any scraps into a ball and return to the fridge until ready to reroll them.

6. Bake cookies approx. 7 minutes. They will appear doughy in the center, but will firm up as they cool. (If you roll your cookies thicker, 1/4 inch or more, your baking time will be closer to 10-15 minutes.)

Saturday, March 17, 2012

Carnitas with Green Salsa


This carnitas or "little meats" recipe is the best tortilla-wrapped food I have ever eaten. Slowly simmered pork is left to sizzle in its own drippings and then combined with a tart acidic green salsa. It's like the shredded pork cousin of churrasco with chimichurri. The tart salsa cuts the fatty flavor of the pork beautifully. The only thing I didn't like about this recipe is the state it left my stock pot in – an overnight soaking was required. It's definitely worth the trouble, but next time I'm going to try a two-part process, starting in a crockpot and then transferring to a cast iron skillet for the final crisping phase. I'll report back once I've tried the new cooking method, but I see no reason to deny you this deliciousness in the meantime.

First you're going to need a pork shoulder roast. Because this is a fattier roast and a lot of the fat renders out, I'm going to advise you to get about 12 ounces of uncooked meat per person. This will give you enough meat for two large tacos per person. This recipe uses a three-pound roast so just scale the recipe up proportionally for whatever roast size your cooking. You chop the roast into two-inch cubes and put it in a large pot with garlic, orange juice, lime juice, salt, and a little cumin.
Then you just barely cover the meat with water, bring the mixture a boil, and reduce the heat to a simmer. You let the pork simmer away for two hours uncovered. Here's the before and after:
After the two hours are up, you crank up the heat a bit and let the remaining liquid cook off. The time on this can vary quite a bit. The recipe said a half hour or more before all the liquid is gone, but it only took me 10–15 minutes, so keep an eye on it at this point. You'll be left with liquid fat at the bottom. You gently turn the meat until it's browned on all sides. 
Then you remove, shred, and serve.

Now while the meat is going on that two-hour simmer, you shouldn't twiddle your thumbs. Take 25 minutes and make green salsa. First toss the tomatillos, onion, and three cloves of garlic in the oven to roast for about 15 minutes.

Scrape all the roasted veggies in a bowl. Add jalapeƱos, lime juice, another clove of garlic, a big handful of cilantro, and salt. Puree and you're done!
Serve with the meat in tortillas or taco shells. Or make the best nachos ever! Add whatever other fixings you like, but you don't need to go overboard since the meat and salsa are so flavorful. We liked ours with avocado and Greek yogurt, my go-to sour cream replacement.

Carnitas
Adapted from The Homesick Texan Cookbook via Smitten Kitchen
Serves 4 generously
Cooking Time: 2 hours 45 min. (maybe 30 min. active)

Ingredients

3 pounds pork shoulder roast
1/2 cup orange juice (I used tangelo juice because it's what I had around.)
1/4 cup lime juice
4 cloves garlic, crushed
1 teaspoon cumin
1 teaspoon salt, plus more to taste

Directions.

1. Cut the pork roast into 2-inch chunks and put in a large pot. Add all the other ingredients.

2. Add water to the pot until the meat is just covered.

3. Bring the liquid to a boil then reduce to a low simmer. Simmer uncovered for 2 hours.

4. After the 2 hours are up turn the heat up to medium-high and cook off the remaining water/juice. At this stage, check the meat every few minutes. It could take anywhere from 10-40 minutes for the rest of the liquid to evaporate.

5. When there is just liquid fat in the bottom of the pot start turning the meat to brown it on all sides.

6. Remove meat from pot and shred with two forks. Serve in tortillas with the salsa below.

Green Salsa
Adapted from Food in Jars (although the idea to pair it with carnitas was also inspired by The Homesick Texan Cookbook)
Makes a lot (4 cups maybe? Probably enough for two batches of carnitas.)
Cooking time: 25 min. (10 active)

1 pound tomatillos
1-2 jalapeƱos, seeded and chopped (I used 2, but mine weren't very spicy.)
4 cloves garlic
2 tablespoons lime juice
1 medium onion
1/ 4 cup packed cilantro (Didn't actually measure. This is a guesstimate.)
salt to taste

1. Preheat your oven to 425 degrees and line a baking sheet with foil or parchment.

2. Husk, wash, and slice the tomatillos in half. Cut the onion into large chunks.

3. Roast the tomatillos, onion chunks, and 3 cloves of garlic for 15 minutes.

4. Scrape into a bowl and add the other ingredients. Puree with an immersion blender.

5. Salt to taste and serve with the carnitas. The salsa will get better as its sits and the flavors meld so feel free to make it ahead of time.

Friday, March 9, 2012

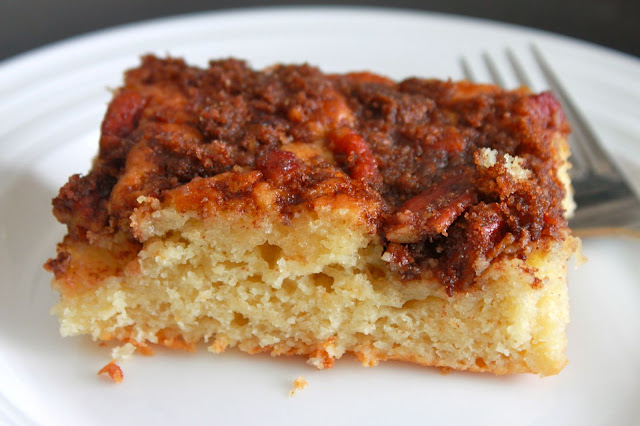
Cinnamon Pecan Coffee Cake

I love baked goods in the morning. An awesome cup of coffee + coffee cake = a happy Katelyn. Dessert for breakfast? Heck yes. (Don't look at me weird, my friend Sam likes to eat cannolis for breakfast when she visits Italy. I call that smart calorie prioritization.)
This recipe is not healthy, but it's not a complete diet wrecker either. That's because the moisture content comes from applesauce, yogurt, and butter rather than butter, butter, and more butter. There is no sacrifice in taste however. The cake has a great moist crumb and tastes mildly of vanilla and the topping is cinnamon-pecan-brown sugar crumbly awesomeness. It reminds me of the cinnamon swirl coffee cake they serve at Starbucks, but better because this has pecans and doesn't cost $3 a slice. You can go even lower on fat/calories with this recipe by replacing the stick of butter with more applesauce, but the cake will taste pretty apple-y and be drier, without as much of the delicate vanilla flavor. You could also scale back the sugar in the cake significantly if you don't like your dessert-for-breakfast super sweet.

To start this cake, you beat a stick of butter until it's nice and fluffy. Add the applesauce and yogurt. Beat in the sugar and vanilla.
Then you beat in the eggs one at a time. Sift the dry ingredients over the top and gently fold the mixture until it's just combined. You'll have a fairly thick, lumpy batter to spread in a greased 9 by 13 pan. (This would also be really good baked in a bundt pan with the crumble layered in the center, but you'd probably need to adjust the baking time.)
The topping is simply a little butter stirred together with brown sugar, cinnamon, and chopped pecans and sprinkled over the top.
 Half an hour or less of baking time and you've got this:

Cinnamon Pecan Coffee Cake
Yields 16 small servings (3.25" by 2.25" slices)
Cooking Time: 50 min. (20 active)
Adapted from this recipe


For the cake:

2 cups flour
1/4 teaspoon salt
1 tablespoon baking powder

1 stick (4 ounces) butter (room temp. is easier to beat, but not strictly necessary)
1 cup good quality, unsweetened Greek Yogurt or sour cream (I use Fage 0% in all my recipes!)
1/2 cup unsweetened applesauce (often snack sizes come in 1/2 cup portions so you don't have to worry about using up an opened container if you go that route)

1 1/2 cups sugar (or less)
1 tablespoon vanilla extract
2 eggs

For the topping:

2 tablespoons butter, melted
1/2 cup packed brown sugar
1 cup pecans, roughly chopped
1 tablespoon cinnamon

Directions

1. Grease a 9 by 13 pan and preheat your oven to 350 degrees.

2. In a flour sifter, stir together the flour, salt, and baking powder. Set aside.

3. In a large mixing bowl, beat the butter until it is light and fluffy. Beat in the applesauce and yogurt.

4. Beat in the sugar and vanilla. Beat in the eggs 1 at a time.

5. Sift the flour mixture over the wet ingredients and gently fold them together by hand until just combined.

6. Spread the batter into the prepared pan.

7. In another bowl stir together the topping ingredients. Sprinkle evenly over the cake.

8. Bake for about 25-30 minutes or until a toothpick inserted in the center comes out clean. (Using the convection setting on my toaster oven it takes exactly 25 minutes for me.)

Saturday, March 3, 2012

Chicken with Peach Bourbon Barbeque Sauce

Let me start by saying that homemade barbeque sauce is where it's at! This sauce is an adaptation from a Williams-Sonoma cookbook and it's reeealllllyyyy good. The first few days it's too peachy almost like seasoned peach butter. It really needs at least 2 or 3 days for the flavors to meld, then it tastes awesome. Smooth. Complex. Mellow peach flavor. Hint of bourbon and molasses. If you want the best flavor, can it and let it mature for a week or two. This would be a perfect use for overripe, bruised peaches. I used peaches that I had frozen and weren't fit for anything else.

Although this is a canning recipe, it doesn't have to be. There is enough sugar and acid in this homemade sauce that it will keep at least a couple of weeks in the fridge. You could also scale this back to a quarter batch for a single 16 ounce jar. Be warned: this is a sweet thick sauce, so if your into the runny vinegary Carolina stuff, this is not for you.
This is also my favorite way to make chicken in pieces. It's quick, easy, doesn't require a grill, and produces moist meat every time. While your oven preheats to 450 degrees, you brown the chicken skin side down for a few minutes in a cast iron skillet over medium heat. No need to oil the skillet since the fat of the skin will render and the chicken will release from the pan. Flip and brown on the other side. Usually I brown chicken to a darker bronze, but since we're adding a sweet sauce that will caramelize some, go for a lighter golden brown (unless you want to set off your smoke detectors. Twice. Not that that ever happens in my perfectly organized kitchen. Riiiiiiight.)
Then you baste them with a coat of the sauce:
And throw them in your preheated oven for about 15-20 minutes. And voila, you're done!
You can make as many chicken pieces as you can cram in your skillet. The beauty of this method though is that it's quick so I usually make just enough for that night since leftovers won't have the crisp skin like chicken straight out of the skillet.

Peach Bourbon Barbeque Sauce
Yields about 4 Pint (16 ounce) Jars
Cooking Time: Approx. 90 min. (including hot water bath canning)
Adapted from Williams-Sonoma's The Art of Preserving

4 lbs peaches
1/4 cup fresh lemon juice

olive oil, for sauteing
8 ounces (about 2 cups) onion, chopped
6 cloves garlic, chopped

2 cups packed dark brown sugar
1 cup cider vinegar
1/2 cup bourbon

2 Tablespoons molasses
1 cup Worcestershire sauce
1/4 cup ketchup
2 Tablespoons peeled and grated fresh ginger
2 Tablespoons chili powder
salt and pepper, to taste


1. Pit and slice the peaches, no need to remove the skin. Toss them with the lemon juice in a bowl and set aside.

2. In a sauce pan, saute the onions in a little olive oil until tender.

3. Add the garlic and cook for another minute.

4. Add the peaches, sugar, vinegar, and bourbon. Bring to a boil then reduce to a simmer. Simmer until peaches and onion are very tender, about 30 minutes.

5. Remove from heat and puree with a hand blender.

6. Stir in the rest of the ingredients. Bring to a boil and reduce to a simmer. Simmer about 10 minutes to let the flavors meld a little. Adjust seasoning if necessary.

7. Ladle the hot sauce into hot clean jars leaving 1/4 inch headspace. Remove any air bubbles, wipe rims, and apply lids. Process for 15 minutes in a hot water bath.